I admit it: since I discovered Cypress, test automation has never been the same. Although my origins in this field go back to the combination of Java, Gradle, TestNG, Selenium and Jenkins, I have long since migrated to greener fields with Typescript, GitHub Actions, Cypress and Cucumber. Cypress’s element location management won me over from the start, so it didn’t take me long to start moving towards this technology.
While Cypress does not provide direct support for working with BDD, there are a number of packages that provide this versatility, making it possible to write test scenarios using natural language and run them directly in Cypress. This synergy facilitates communication between the different roles and improves test visibility across the team, which in turn promotes transparency and a common understanding of the requirements and functionality of the application. In short: it allows the Product Owner and other team members (technical and non-technical) to understand what functionality the tests are covering.
In this article we are going to learn how to set up the skeleton of a small project that will make use of the following technologies to automate the testing of a website:
- Typescript
- Cypress
- Cucumber
For this purpose, we will use https://the-internet.herokuapp.com as the target of our tests, as it offers a number of typical functionalities in the world of automation.
Prerequisites
To carry out this project, we will need the following:
- A GitHub account.
- A development IDE. Personally, I recommend Visual Studio Code.
- NodeJS + npm installed on your computer. If you don’t use it yet, I recommend nvm to manage NodeJS versions.
Creating the project on GitHub
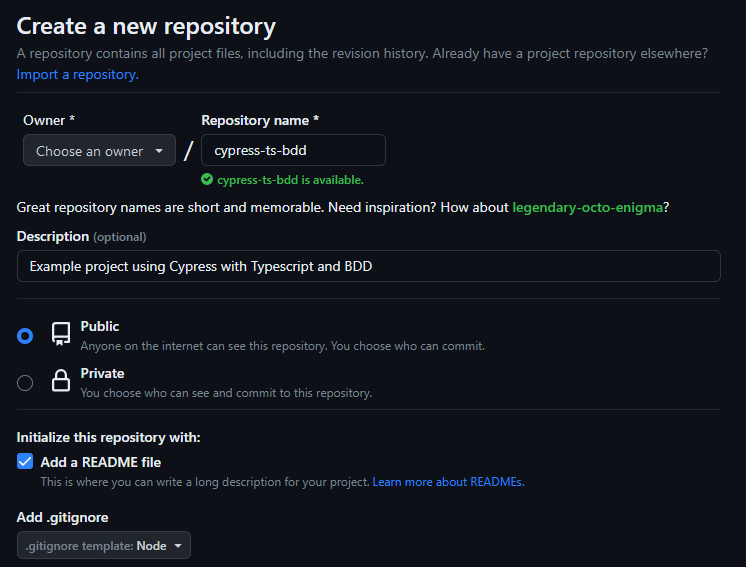
Our first step is to log into our GitHub account and create a new repository. We’ll give it a representative name, a short description, add a README and specify “Node” as the .gitignore template.
With our project created, it’s time to clone it in our IDE. To do this, we will deploy the “<> Code” menu of the repository and copy the repository address.
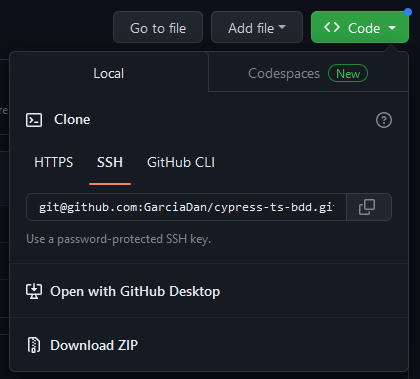
After doing this, we open a console and go to the directory where we want to locally host the repository and run the following (changing the repository address to the one we just created):
git clone git@github.com:GarciaDan/cypress-ts-bdd.gitIf the repository visibility is public, this will work fine. However, if we want to communicate with GitHub effectively and upload our local changes to the remote repository, we will need to use an ssh key.
To create a private key, run the following in a terminal:
ssh-keygen -t ed25519 -C "your_email@example.com"This will generate a private key and a public key:
Generating public/private ed25519 key pair.
Enter file in which to save the key (/home/daniel/.ssh/id_ed25519):
Enter passphrase (empty for no passphrase):
Enter same passphrase again:
Your identification has been saved in /home/daniel/.ssh/id_ed25519
Your public key has been saved in /home/daniel/.ssh/id_ed25519.pub
The key fingerprint is:
SHA256:+Fss5a3UMmvRY+t6EjbDJC9kVCnWtP0NxsToFsZAZFY your_email@example.com
The key's randomart image is:
+--[ED25519 256]--+
|         *O=Eo.  |
|        +ooo=o.  |
|       o ..o..+  |
|       .+ . oo o |
|      .oS=.o  . .|
|       ..+Oo+    |
|        ooB*oo   |
|         =o=o    |
|        ..+=.    |
+----[SHA256]-----+
Now, copy the public key content:
cat ~/.ssh/id_ed25519.pub
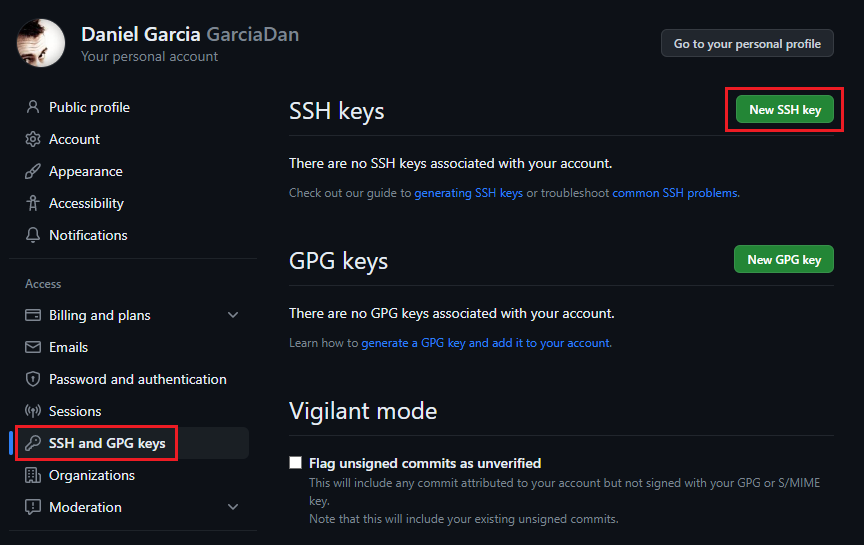
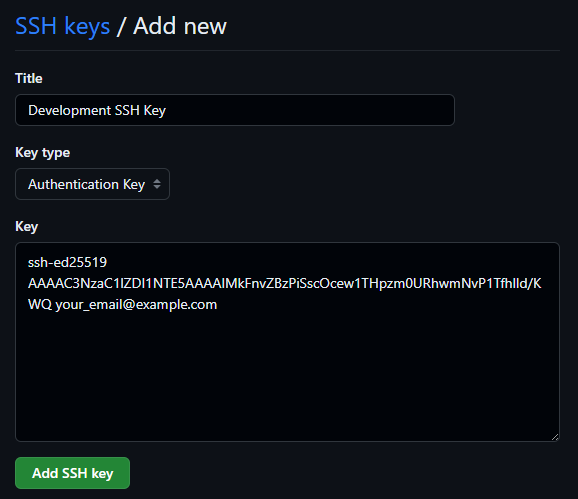
ssh-ed25519 AAAAC3NzaC1lZDI1NTE5AAAAIMkFnvZBzPiSscOcew1THpzm0URhwmNvP1Tfhlld/KWQ your_email@example.comIn GitHub, click on our Avatar, select “Settings” and go to the “SSH and GPG keys” section. Once there, click on “New SSH Key”.
Paste the content of the public key into the text box and save the changes.
With this we will now be able to use our private key to connect to our GitHub account. To do this, we’ll configure our git client. We open a terminal and type the following (if we haven’t already done so):
git config --global user.name "FIRST_NAME LAST_NAME"
git config --global user.email "your_email@example.com"
Finally, we run the SSH Agent and add the private key by passing the path to the file where we have generated it:
eval "$(ssh-agent -s)"
> Agent pid 59566
ssh-add ~/.ssh/id_ed25519
With this, we have communication between our remote repository and our local repository.
Creating the node project
In our local repository, we initialize a new NPM project.
npm initNow install the necessary packages for our project:
- Cypress
- Cucumber Preprocessor
- EsBuild bundler Preprocessor
- Typescript
npm i -D cypress
npm i -D @badeball/cypress-cucumber-preprocessor
npm i -D @bahmutov/cypress-esbuild-preprocessor
npm i -D typescript
npm i -D @types/node @types/cypress-cucumber-preprocessor
Our package.json file will now look like this:
{
  "name": "cypress-ts-bdd",
  "version": "1.0.0",
  "description": "A simple Cypress+Typescript+BDD scaffolding project",
  "main": "index.js",
  "scripts": {
    "test": "echo \"Error: no test specified\" && exit 1"
  },
  "repository": {
    "type": "git",
    "url": "git+https://github.com/GarciaDan/cypress-ts-bdd.git"
  },
  "author": "Daniel Garcia",
  "license": "ISC",
  "bugs": {
    "url": "https://github.com/GarciaDan/cypress-ts-bdd/issues"
  },
  "homepage": "https://github.com/GarciaDan/cypress-ts-bdd#readme",
  "devDependencies": {
    "@badeball/cypress-cucumber-preprocessor": "^17.1.1",
    "@bahmutov/cypress-esbuild-preprocessor": "^2.2.0",
    "@types/cypress-cucumber-preprocessor": "^4.0.1",
    "@types/node": "^20.2.3",
    "cypress": "^12.12.0",
    "typescript": "^5.0.4"
  }
}
Cypress default configuration generation
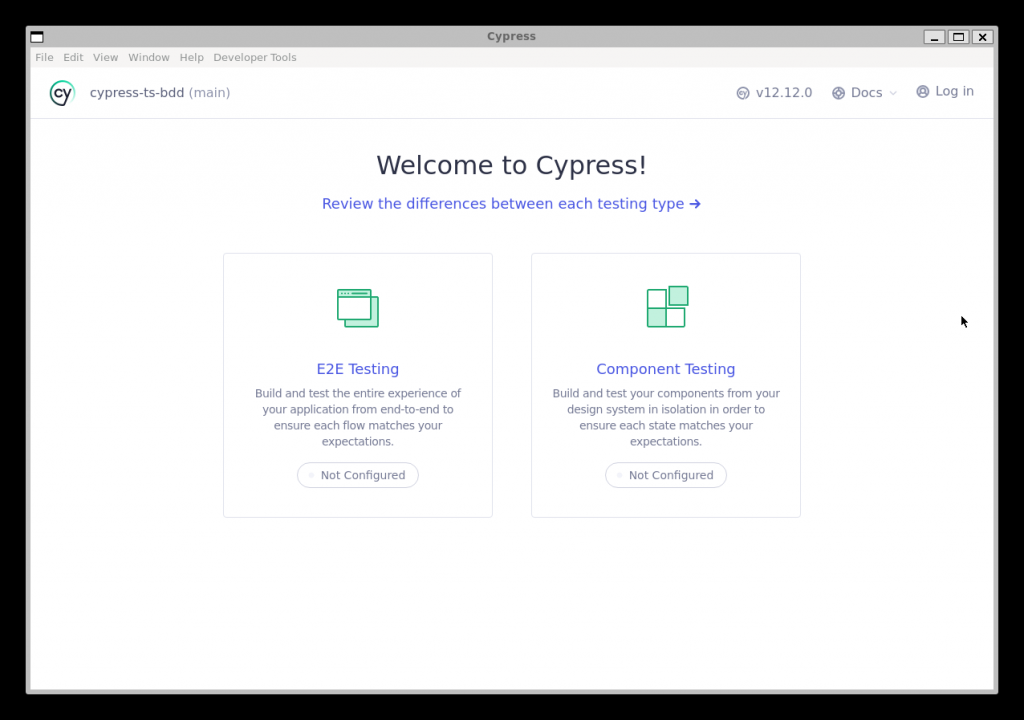
Cypress generates a default configuration during the first run. Therefore, let’s open the Cypress interface:
npx cypress open
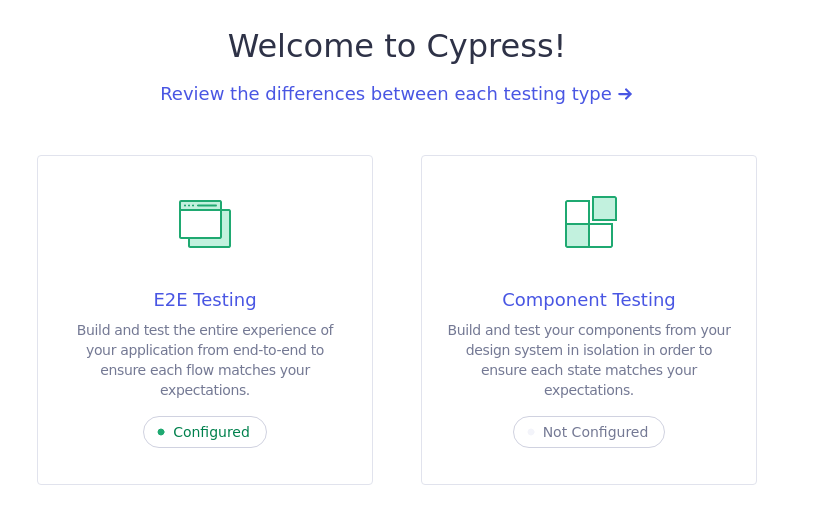
Click on “Continue >” and select the “E2E Testing” option, which is set to “Not Configured”.
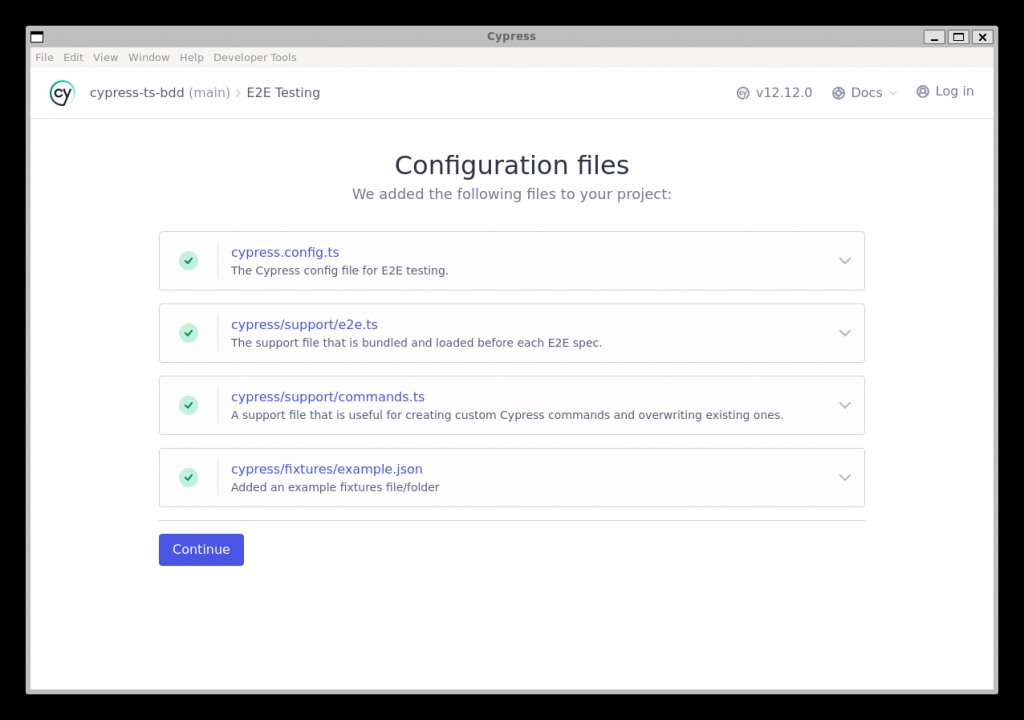
This should generate the default configuration files:
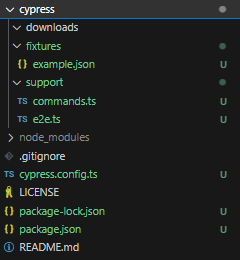
Now, or project files should look like this:
Done this, we define the place where we will store the step definition (Typescript code). We add the following to our package.json:
  "cypress-cucumber-preprocessor": {
    "stepDefinitions": [
      "cypress/e2e/**/*.ts"
    ]
  }
So the file should now look like this:
{
  "name": "cypress-ts-bdd",
  "version": "1.0.0",
  "description": "A simple Cypress+Typescript+BDD scaffolding project",
  "main": "index.js",
  "scripts": {
    "test": "echo \"Error: no test specified\" && exit 1"
  },
  "repository": {
    "type": "git",
    "url": "git+https://github.com/GarciaDan/cypress-ts-bdd.git"
  },
  "author": "Daniel Garcia",
  "license": "ISC",
  "bugs": {
    "url": "https://github.com/GarciaDan/cypress-ts-bdd/issues"
  },
  "homepage": "https://github.com/GarciaDan/cypress-ts-bdd#readme",
  "devDependencies": {
    "@badeball/cypress-cucumber-preprocessor": "^17.1.1",
    "@bahmutov/cypress-esbuild-preprocessor": "^2.2.0",
    "@types/cypress-cucumber-preprocessor": "^4.0.1",
    "@types/node": "^20.2.3",
    "cypress": "^12.12.0",
    "typescript": "^5.0.4"
  },
  "cypress-cucumber-preprocessor": {
    "stepDefinitions": [
      "cypress/e2e/**/*.ts"
    ]
  }
}
Typescript configuration
We will now configure Typescript by creating the tsconfig.json file in the root directory of the project. In it we will include the following:
{
    "compilerOptions": {
        "target": "ES2021",
        "lib": ["ES2021", "DOM"],
        "types": ["cypress", "node"],
        "moduleResolution": "node16",
        "esModuleInterop": true,
        "allowSyntheticDefaultImports": true
    },
    "include": ["**/*.ts"]
}
With these options we will tell typescript to transpile the Javascript code in the ES2021 version of ECMAScript, allowing us to use APIs such as array.include(), Object.entries(), string.trimEnd(), promise.any(), ….
- By including the “DOM” library we will also be able to access DOM objects such as
windowordocument. - We also include Cypress and NodeJS types, making the resolution of “
node16” modules to support the latest versions of Typescript (from version 4.7 onwards). - Finally, we included the options
esModuleInteropandallowSyntheticDefaultImportsto avoid errors when importing certain modules (such as those that do not have a default export).
Cypress Configuration
It’s time to configure Cypress. Although it is not mandatory, we will start by creating a file to define the Cypress tasks. This way we will avoid declaring them directly in the configuration file and their modification will be much easier. For example, we will create a “dummy” task which we will call “stdout” and which will display a message on the console:
const tasks = {
    stdout: (...data: Array<any>) => {
        console.log(data)
    }
};

export default tasks;
We now edit the configuration file cypress.config.ts, which looks like this:
import { defineConfig } from "cypress";

export default defineConfig({
  e2e: {
    setupNodeEvents(on, config) {
      // implement node event listeners here
    },
  },
});
We separately define the setupNodeEvents function and add the Cucumber preprocessor to it:
import { defineConfig } from "cypress";
import { addCucumberPreprocessorPlugin } from "@badeball/cypress-cucumber-preprocessor";

async function setupNodeEvents(
  on: Cypress.PluginEvents,
  config: Cypress.PluginConfigOptions
): Promise<Cypress.PluginConfigOptions> {
  await addCucumberPreprocessorPlugin(on, config);
  return config;
}

export default defineConfig({
  e2e: {
    setupNodeEvents,
  },
});
Now add, the esbuild bundler preprocessor:
import { defineConfig } from "cypress";
import { addCucumberPreprocessorPlugin } from "@badeball/cypress-cucumber-preprocessor";
import createEsbuildPlugin from "@badeball/cypress-cucumber-preprocessor/esbuild";
import createBundler from "@bahmutov/cypress-esbuild-preprocessor/src";

async function setupNodeEvents(
  on: Cypress.PluginEvents,
  config: Cypress.PluginConfigOptions
): Promise<Cypress.PluginConfigOptions> {
  await addCucumberPreprocessorPlugin(on, config);
  on(
    "file:preprocessor",
    createBundler({ plugins: [createEsbuildPlugin(config)] })
  );
  return config;
}

export default defineConfig({
  e2e: {
    setupNodeEvents,
  },
});
We define the tasks. As we have created them in an external file, we import them and add them to the setupNodeEvents() function:
import { defineConfig } from "cypress";
import { addCucumberPreprocessorPlugin } from "@badeball/cypress-cucumber-preprocessor";
import createEsbuildPlugin from "@badeball/cypress-cucumber-preprocessor/esbuild";
import createBundler from "@bahmutov/cypress-esbuild-preprocessor/src";
import tasks from "./cypress/support/tasks";

async function setupNodeEvents(
  on: Cypress.PluginEvents,
  config: Cypress.PluginConfigOptions
): Promise<Cypress.PluginConfigOptions> {
  await addCucumberPreprocessorPlugin(on, config);
  on(
    "file:preprocessor",
    createBundler({ plugins: [createEsbuildPlugin(config)] })
  );
  on("task", tasks);
  return config;
}

export default defineConfig({
  e2e: {
    setupNodeEvents,
  },
});
Finally, we add the following configuration to defineConfig.e2e in cypress.config.ts:
specPattern: tells Cypress where to look for (and with which pattern) the Gherkin language features.supportFile: tells Cypress where to find the support file (e2e.ts).baseUrl: sets the base URL of the project.
import { defineConfig } from "cypress";
import { addCucumberPreprocessorPlugin } from "@badeball/cypress-cucumber-preprocessor";
import createEsbuildPlugin from "@badeball/cypress-cucumber-preprocessor/esbuild";
import createBundler from "@bahmutov/cypress-esbuild-preprocessor/src";
import tasks from "./cypress/support/tasks";

async function setupNodeEvents(
  on: Cypress.PluginEvents,
  config: Cypress.PluginConfigOptions
): Promise<Cypress.PluginConfigOptions> {
  await addCucumberPreprocessorPlugin(on, config);
  on(
    "file:preprocessor",
    createBundler({ plugins: [createEsbuildPlugin(config)] })
  );
  on("task", tasks);
  return config;
}

export default defineConfig({
  e2e: {
    setupNodeEvents,
    specPattern: "./cypress/e2e/**/*.{feature,features}",
    supportFile: "./cypress/support/e2e.ts",
	baseUrl: "https://the-internet.herokuapp.com"
  },
});
Environment variables
Instead of defining the environment variables in the configuration file, it is advisable to generate a cypress.env.json file and define them inside it. For example, we will define the username and password:
{
    "USERNAME": "tomsmith",
    "PASSWORD": "SuperSecretPassword!"
}
Creating a feature
Now it’s time to create our first test. Let’s start by creating the following folder structure:
- cypress/e2e/login/features
- cypress/e2e/login/steps
Inside cypress/e2e/login/features, we create the login-form.feature file and add the following test:
Feature: User is able to sign in the web application
    Scenario: User logs in successfully
        Given the user navigates to login page
        When the user provides valid credentials
        Then the main page is displayed to the authenticated user
The next step is, as we can imagine, to implement the steps.
We create the login-form.cy.ts file inside the cypress/e2e/login/steps/ folder and implement the three steps we just used in the feature.
The first step makes us visit the login URL:
import { Given, When, Then } from "@badeball/cypress-cucumber-preprocessor";

const LOGIN_PAGE_URL = "login";

Given("the user navigates to login page", () => {
  cy.visit(LOGIN_PAGE_URL);
});
The second step retrieves the environment variables USERNAME and PASSWORD from cypress.env.json and uses them to fill in the login form, to press the login button afterwards:
When("the user provides valid credentials", () => {
  const userName = Cypress.env("USERNAME");
  const password = Cypress.env("PASSWORD");

  cy.get("#username").clear().type(userName);
  cy.get("#password").clear().type(password);

  cy.get("button").click();
});
The last step is to perform a couple of checks to make sure that the page is displayed correctly.
Then("the main page is displayed to the authenticated user", () => {
  cy.get('[class="flash success"]').should("exist").and("be.visible");
  cy.get('a[href="/logout"]').should("exist").and("be.visible");
});
The complete file would be as follows:
import { Given, When, Then } from "@badeball/cypress-cucumber-preprocessor";

const LOGIN_PAGE_URL = "login";

Given("the user navigates to login page", () => {
  cy.visit(LOGIN_PAGE_URL);
});

When("the user provides valid credentials", () => {
  const userName = Cypress.env("USERNAME");
  const password = Cypress.env("PASSWORD");

  cy.get("#username").clear().type(userName);
  cy.get("#password").clear().type(password);

  cy.get("button").click();
});

Then("the main page is displayed to the authenticated user", () => {
  cy.get('[class="flash success"]').should("exist").and("be.visible");
  cy.get('a[href="/logout"]').should("exist").and("be.visible");
});
VSCode configuration with Cucumber support
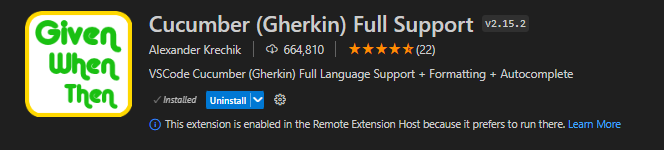
If you use Visual Studio Code as an editor, it is highly recommended to support Cucumber with the CucumberAutoComplete extension. This extension allows, among other things, to navigate from step definition to implementation, so it can save a significant amount of time during development. You can get the extension here.
Once installed, edit the .vscode/settings.json file and add the following:
{
    "cucumberautocomplete.steps": [
        "cypress/e2e/*/**/steps/*.ts"
    ],
    "cucumberautocomplete.strictGherkinCompletion": false,
    "cucumberautocomplete.smartSnippets": true
}
Test Execution
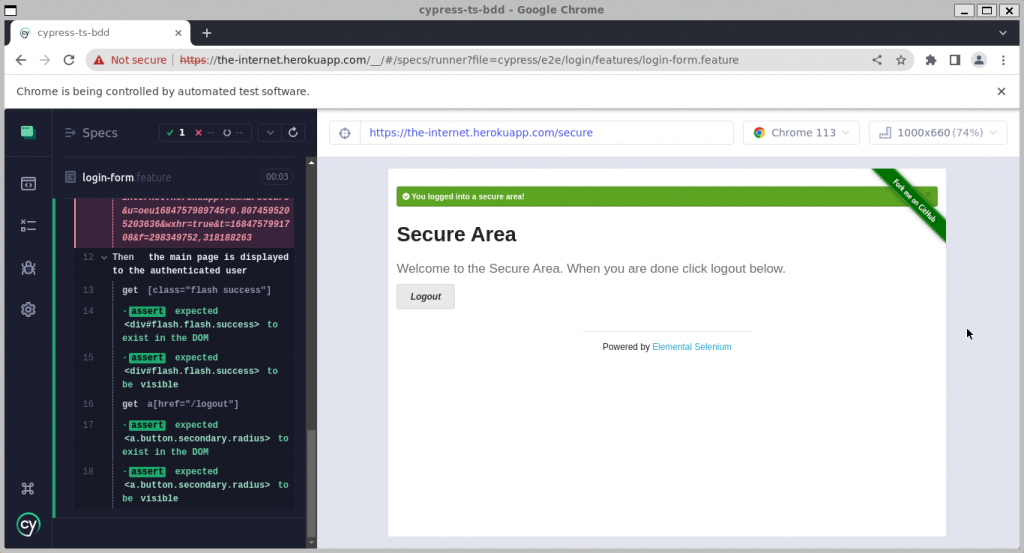
Everything should be ready to run our first test using Cypress, Typescript and Cucumber. Let’s see the result. Open a terminal and run the following:
npx cypress openSelect the option “E2E Testing”.
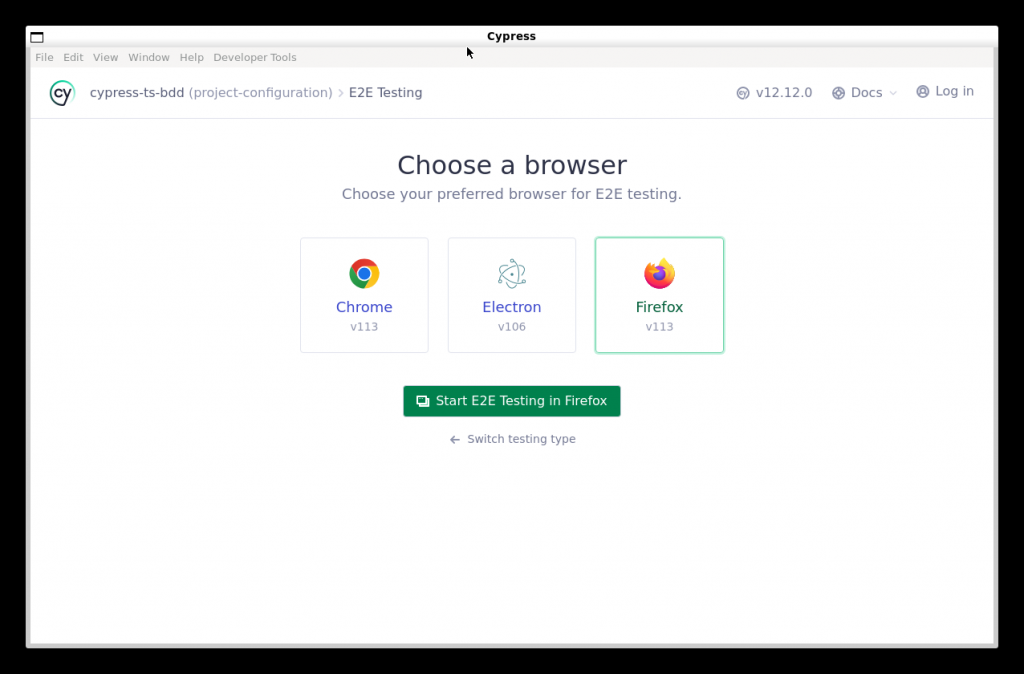
Choose a browser (e.g. Chrome)
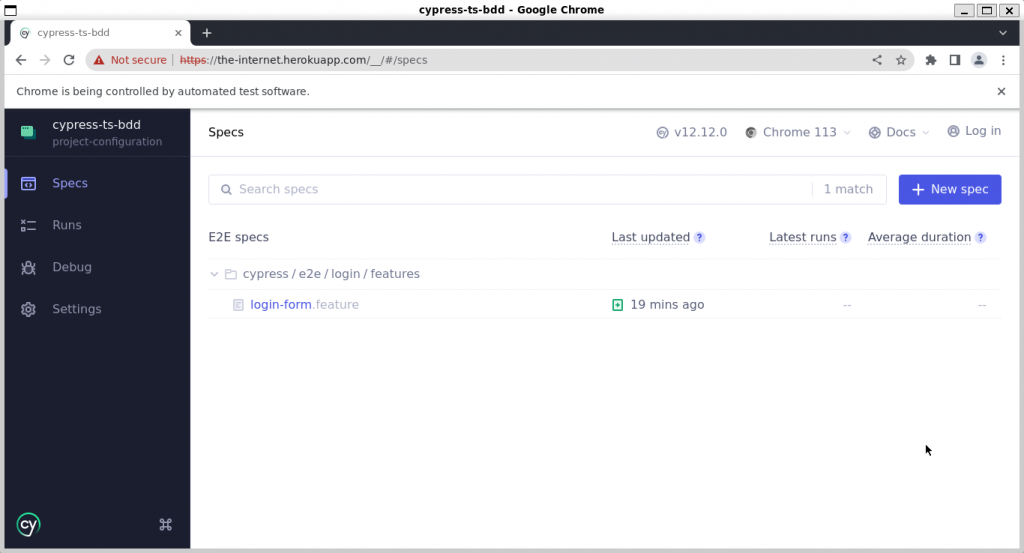
Click on login-form.feature to run the test and wait for the result.
Done! With this, our skeleton is complete and we can start adding more tests.
You can get the code related to this post in this repo.